
Seating
Wheelchairs are one of the most used assistive devices for people who have difficulties in transferring from one place to another. Making sure that a wheelchair fits its owner is a priority because a good fit = a good and comfortable sitting posture. A suitable wheelchair optimizes an individual’s performance in daily activities and facilitates environmental access.
It is a device, which can either be manually operated or power-driven, that is used by individuals with mobility disabilities to help them move from one place to another indoors and outdoors. It can either be standard or customized.
What is the difference between a standard wheelchair and a customized wheelchair?
-
Standard wheelchair is the most basic type and it is intended for short-term use. This type can be found everywhere, in stores and hospitals. It is fixed and has standard dimensions and features.
-
Customized / Specialty wheelchair is designed and built to address the specific needs and requirements of an individual as well as addressing specific disabilities. It is not available in markets; it has to be ordered.
Importance of Seating
For some people, having a wheeled mobility device is essential to complete ADLs and IADLs independently. Seating has many purposes, and these include promoting posture, maximizing function, minimizing deformity, accommodating deformity, normalizing muscle tone, preventing pressure sores, promoting comfort and physiological functions, and finally improving the QOL.
When designing the wheelchair, we have to make sure that it fits the individual perfectly, enables him/her to perform well and safely while providing postural support.
-
Referral Source
-
Obtained from physician
-
-
Assessment
-
Writing a Report
-
You will choose the appropriate type of wheelchair along with the seating systems which are suitable for and fit the individual’s needs. After that, a report specifying the type of wheelchair and seating systems will be written and sent to the company that is going to build the wheelchair.
-
-
Trial
-
The individual will try different types of wheelchairs to decide which one is suitable for him/ her
-
-
Fund
-
The individual pays for the wheelchair
-
-
Delivery
-
Waiting for the arrival of the wheelchair. During this phase, the therapist educates the individual and the caregiver about the correct positioning in wheelchair:
-
Head is upright and in midline
-
Shoulders are relaxed
-
Arms can be supported but are free to move
-
Trunk is upright
-
Pelvis in neutral position
-
Thighs and legs slightly abducted
-
-
-
Follow up and maintenance
-
It involves checking the wheelchair fit and providing further training if needed
-
Starts by:
-
Identifying the needs and goals of the individual, his / her family and caregiver
-
Checking the previous seating system ‘if the client has one’:
-
Physical Examination (MAT) to check
-
Cognitive Abilities and perception
-
Functional skills and ADLs
-
Measurements
Use of Formal Assessments: Microsoft Word - 3701H.doc (illinois.gov)
-
Flexible: the range of motion in the joint is easily manipulated and the deformity can be reversed. The goal of intervention in this type is to prevent the deformity from becoming fixed therefore you focus on correcting it.
-
Partially flexible: the range of motion in the joint is manipulated with resistance. The joint moves when force is applied.
-
Fixed: the joint has restricted range of motion and will not assume a neutral posture. When force is applied the other joints will move to compensate. The goal in this type is to prevent further progression that why you will focus on accommodating the deformity.
-
Durability: The ability of a material to remain serviceable and functional in the surrounding environment for a long time without being damaged or requiring unexpected maintenance.
-
Problems
-
Positive aspects
-
Transportability
-
Determining the needed upgrades
-
Pelvic & Spine
-
Head & neck
-
Upper and Lower limb functions
-
Muscle tone and power
-
Sitting balance
-
Endurance
-
Skin integrity
-
Deformities: They can be classified as either flexible, partially flexible or fixed
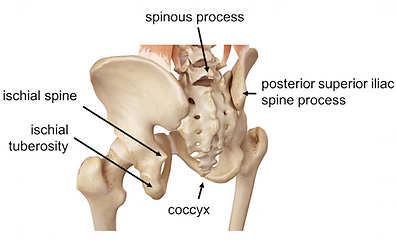

Important Anatomical Structures
-
ASIS
-
PSIS
-
Greater Trochanter
-
Ischial Tuberosity

Tip on how to find PSIS and ASIS
PSIS: stand behind the patient and find the iliac crest laterally and then move your thumbs in and down until you find a bony bump. Another way is by looking for the dimples on the lower back and then looking for the PSIS under them.
YouTube Video link: Surface Anatomy: Pelvis, Posterior Landmarks on Model - YouTube
ASIS: stand next to the patient and place your fingers on the anterior part of the iliac crest. Start moving your fingers anteriorly and distally until you find a bony prominence which is the ASIS.
YouTube Video link: Surface Anatomy: Pelvis, Anterior Landmarks on Model - YouTube
It is done in two positions:
-
Supine:
This will allow you to assess the client without the effect of gravity and to safely determine the available ROM by passively moving the legs into positions required for setting and feel for tone. It must be done on a padded firm surface.
-
Check the flexibility and alignment of the head and neck
-
Is it in hyperextension or forward flexion?
-
Presence of ATNR / STNR?
-
-
Check the flexibility of the trunk
-
Are there any spinal curvatures? Kyphosis, lordosis or scoliosis?
-
-
Check the flexibility of the pelvis
-
Determine presence of pelvic obliquity and rotation
-
-
Check the flexibility of the LE and UE
-
Are there any contractures, deformities or limitations?
-
Check the PROM of the hips, knees, ankles and UE
-
-
Skin condition
-
Specially in pressure areas
-
2. Seated:
Make sure the client is safe and provide support if needed! this part will give you feedback on the client’s position with gravity. It can assist in the identification of any postural issues the client is facing. It must be conducted on a firm padded surface with feet supported either on the floor or a foot block.
-
Check the sitting Balance and the effects of gravity on posture
-
Check the alignment of spine
-
Kyphosis? lordosis? scoliosis?
-
Is the ribcage rotated?
-
-
Identify the need for support
-
Check the flexibility of the pelvis and determine if there is a pelvic deformity
-
Assess the tone and motor control
-
Take the measurements
Link to another Website: It All Begins with the Mat Assessment - Permobil Australia
Normal Alignment of The Spine
Deformities in The Alignment of The Spine
-
Kyphosis is a spinal deformity in which the person appears to have a hunched/rounded back due to a curve in the upper back (Thoracic region). It can also occur in the lower spine (Lumbar region). It is an excessive outward curve that can be called hyper kyphosis to differentiate it from the normal kyphosis that is in the thoracic spine.
-
Scoliosis is a condition in which the spine is curved sideways. It is most commonly found in the thoracic region.
-
Lordosis is an exaggerated inward curve of the lumbar spine that gives the person a backward leaning appearance. It can also be called swayback.
Link to another Website: Spinal Deformities – The Spine Hospital at The Neurological Institute of New York (columbiaspine.org)
.png)
.png)
-
Anterior Pelvic Tilt
-
The anterior superior iliac spine ASIS is lower than the posterior superior iliac spine PSIS
-
The trunk will be in an excessive lumbar lordosis
-
There will be an excessive hyperextension in the thoracic region
-
Flattening of the natural cervical curvature will be noticed
-
The head will be in hyperextension with an upward gaze toward the ceiling
-
How to assess it?
-
Palpate both the ASIS and PSIS
-
Compare their position in relation to each other
-
Assess if it is flexible or fixed
Link to another Website: Anterior Pelvic Tilt: Palpating the Pelvis (permobil.com)
-
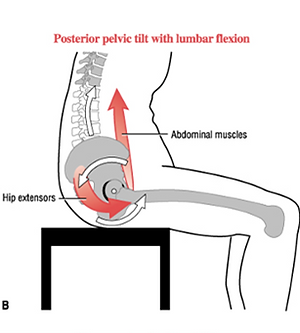
Posterior Pelvic Tilt
-
The ASIS is higher than the PSIS and this causes the person to sit directly on the sacrum which may leads to a high risk of pressure injury
-
The shoulders will be protracted “Rounded” (Kyphotic posture)
-
The spine will have an excessive “C” curvature
-
The head will be in forward flexion with the client looking down at their lap or floor
-
How to assess it?
-
Palpate both the ASIS and PSIS
-
Compare their position in relation to each other
-
Assess if it is flexible or fixed
Link to another website: Posterior Pelvic Tilt: Palpating the Pelvis (permobil.com)
-
Pelvic Rotation
-
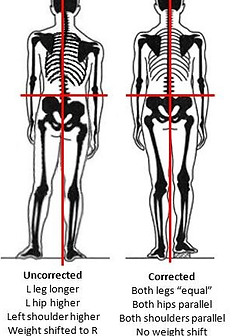
There will be an apparent leg length discrepancy “one leg is shorter that the other”
-
One ASIS is more forward that the other
-
The spine will be rotated with one side appearing to be more forward than the other
-
The head might be in a lateral flexion, rotation, and forward flexion
-
How to assess it?
-
Palpate both ASIS
-
Notice the position of both in relation to each other
-
Identify if they are equal or not
-
Assess if it is flexible or fixed
Link to another Website: Pelvic Rotation: Palpating the Pelvis (permobil.com)
-
Pelvic Obliquity
-
One ASIS is higher than the other / one PSIS is higher than the other
-
The spine presents with scoliosis
-
The head will be in a lateral flexion, rotation, and forward flexion
-
How to assess it?
-
You can either palpate both ASISs or both PSISs “the ASIS will be easier”
-
Identify if the ASISs are equal to each other or if one of them is higher
-
Assess if it is flexible or fixed


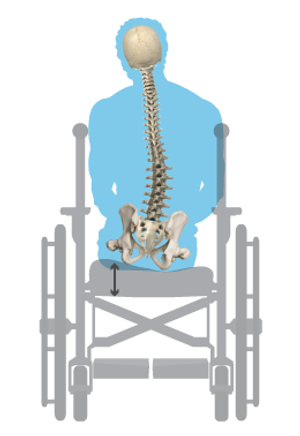

Seat Width:
-
Determine which part (either hips or knees) of the client’s seat is the widest apart and then add two inches to accommodate for movement and bulky winter clothing.
Seat Depth:
-
Measured horizontally from the back of the buttocks to the inside of the knees and minus two inches to prevents the chair from digging into the back of the knees.
Back Height:
-
Measured vertically from the base of seat to the top of the chair height. This will depend on the user and the level support needed.
Seat Height:
-
Measured vertically from the ground to the seat / back of the knees. If the client will use footrests add two inches.
Hanger Angle:
-
This determines the position of footrests in relation to the body. It depends on the knee’s ability to bend. People who have difficulty keeping their knees at 90 would prefer an angle between 60 and 80. A tighter angle would allow the chair to rotate in less space.
Footrest:
-
Measured vertically from the back of the knee to the heel of the foot then two inches at least are added for foot clearance.
Armrest Height:
-
With the arms placed at 90 degrees, take the measurements vertically from the tip of the elbow to the top of the hips.
Link to other websites:

Link to another Website: The purpose of specific body measurements | Agency for Clinical Innovation (nsw.gov.au)

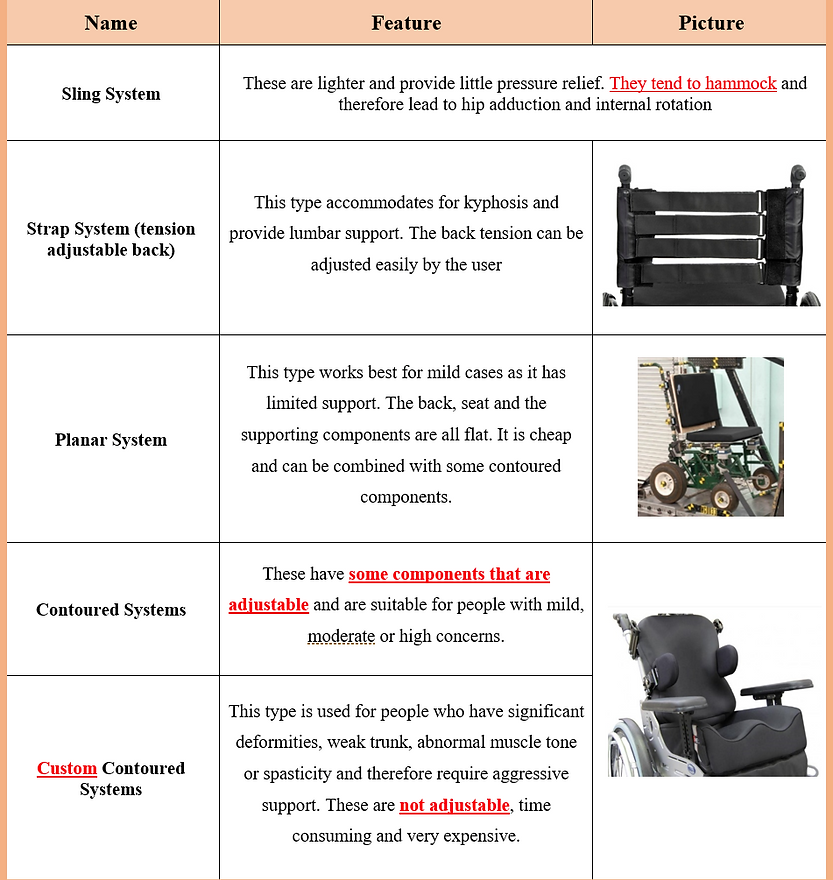
General considerations for the wheelchair
-
The back height of the wheelchair is dependent on the level of support the individual needs and the level of severity.
-
Lower Back is mostly suitable for individuals who are active and have good trunk control and balance. This type allows the use of upper extremity and trunk rotation.
-
High Back is used for individuals who lack trunk control, need intensive support and for those who use a reclined or tilted wheelchair.
-
-
The seat width and depth should fit the body dimensions and allow for future growth while providing the appropriate amount of support to the pelvis and thighs.
-
The seat height is determined by the height of the individual. Self-propelling must be taken into consideration as well because when the individual wants to use his feet to propel, the height of the seat must allow their feet to reach the floor.
-
The armrest height is important as it assists postural control by enabling the individual to sit erect, provides support for upper extremities and allows for transfer.
-
The foot / leg rest can either be fixed or swing away. The angle can be elevated and adjusted. The elevating foot/leg rests mostly used for individuals with limited ROM or Edema.
.png)
.png)
.png)
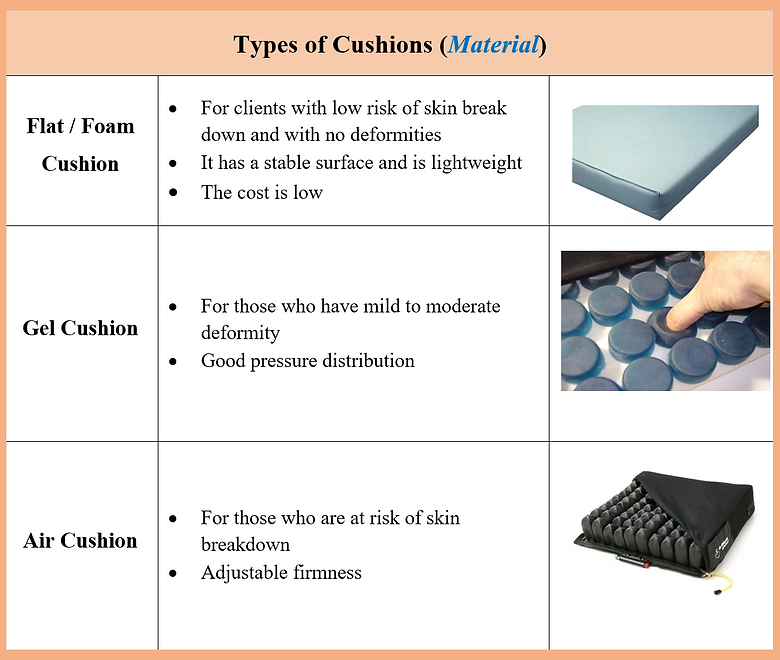
Choosing the right type of cushion will depend on the client’s abilities and risk areas. You must take into consideration the posture of the client for example, is it normal or abnormal? does it cause the client to be at risk of falling or developing contracture?
-
If the client has good balance and strength, able to reposition himself and maintain posture, able to perform pressure relief, has no skin breakdown and good sensation, uses wheelchair minimally, and may or may not be incontinent then a standard cushion will be suitable for him.
-
If the client has poor balance, weakness in pelvis and LE, cannot perform pressure relief, is at risk of skin breakdown, has impaired sensation, has pelvic deformity, is incontinent and uses the wheelchair for a long period of time then a cushion that’s for skin protection and positioning will be suitable for him.
.png)
.png)
.png)
.png)
.png)
.png)
Links to other websites:
-
Pelvic Obliquity Practical Seating Considerations: Pelvic Obliquity | Sunrise Medical
-
All issues with solutions HRSM0630_06_06 (nsw.gov.au)
.png)
.png)
.png)
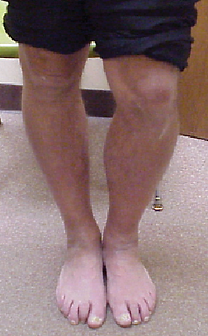
Windswept Deformity is a condition that involves one hip being abducted and externally rotated with the other hip being adducted and internally rotated. It can be associated with pelvic obliquity, pelvic rotation or pelvic posterior tilt.
Leg Length Discrepancy is a condition in which one leg appears longer than the other.


For more case studies you can visit these websites: